Part 2: Deploy WordPress to Kubernetes with Score and score-k8s
After deploying WordPress locally with Score and Docker Compose in Part 1, the next step is moving to a Kubernetes-native workflow.
The key benefit of this approach is clear: we reuse the exact same score.yaml file, without writing Helm charts, duplicating Kubernetes manifests, or introducing new abstractions. The Score spec remains the contract, and the orchestrator becomes the implementation.
This article demonstrates how to deploy WordPress with MySQL on a Kubernetes cluster using score-k8s. The deployment runs entirely within a local Kind cluster. For development purposes, the WordPress application is made accessible using kubectl port-forward.
What You Will Learn
- How to reuse a Score spec to deploy WordPress and MySQL on Kubernetes.
- How to initialize and prepare a local Kind cluster for Kubernetes development.
- How platform engineers use Score provisioners to fulfill resource needs.
- How to generate and apply manifests with
score-k8s. - How to access the deployed workload via
kubectl port-forward.
Table of Contents
- What You Will Learn
- Table of Contents
- Prerequisites
- Quick Start
- 1. Reuse the WordPress Score Spec.
- 2. Initialize the Kubernetes Project with
score-k8s. - 3. Generate Kubernetes Manifests from Score.
- 4. Apply the Manifests and Deploy to Kubernetes.
- 5. Port Forward and Access WordPress.
- Summary
- Contribute to the Awesome Score Spec
Prerequisites
The following tools must be installed before proceeding:
A running Kubernetes cluster must be available. If one is not accessible, the local development environment can be prepared using Kind. The repository includes a helper script for this purpose.
The following command provisions a local Kind cluster and prepares it for use:
$ ./scripts/setup-kind-cluster.shThis script outputs progress logs and indicates when the cluster is ready.
To begin working from the example project, the repository can be cloned as follows:
$ git clone https://github.com/victor-ikeme/awesome-score-spec-examples
$ cd awesome-score-spec-examples/wordpress-mysql
Quick Start
The project’s Makefile contains automation scripts for common tasks such as provisioning, loading images, and deploying the stack.
The following commands initialize a Kind cluster, load local container images, and deploy the application:
$ make kind-create-cluster
$ make kind-load-images
$ make k8s-test
Then follow the displayed link from the output in location:
To tear down the deployment and clean up Kubernetes resources:
$ make k8s-downThis process removes the workloads but leaves the cluster intact for future development.
1. Reuse the WordPress Score Spec.
This deployment uses the same score.yaml file introduced in Part 1. The file expresses application intent without referencing any infrastructure-specific tooling.
The contents of the spec are as follows:
apiVersion: score.dev/v1b1
metadata:
  name: wordpress
containers:
  wordpress:
    image: wordpress:latest
    variables:
      WORDPRESS_DB_HOST: ${resources.db.host}
      WORDPRESS_DB_USER: ${resources.db.username}
      WORDPRESS_DB_PASSWORD: ${resources.db.password}
      WORDPRESS_DB_NAME: ${resources.db.name}
service:
  ports:
    tcp:
      port: 8080
      targetPort: 80
resources:
  db:
    type: mysql
This spec declares:
- A containerized workload for WordPress.
- Environment variables sourced from a managed database.
- A service exposed on port 8080.
- A MySQL resource described as
type: mysql.
No Kubernetes-specific details are included. All implementation logic is deferred to the platform layer.
2. Initialize the Kubernetes Project with score-k8s.
To prepare the project for deployment on Kubernetes, the developer must initialize the score-k8s environment. This process scaffolds the necessary configuration files and registers a set of default provisioners — including support for commonly requested services such as MySQL, PostgreSQL, Redis, and more.
The following command performs this initialization:
$ score-k8s initThis command creates a new directory named .score-k8s/, which contains provisioner metadata and configuration used during workload generation.
Once initialized, verify which provisioners are currently available by running:
$ score-k8s provisioners listThis command displays all resource types supported by the registered provisioners, along with their parameters and outputs. The output includes an entry for type: mysql, confirming that MySQL provisioning is supported out-of-the-box:
| TYPE      | CLASS | PARAMS | OUTPUTS | DESCRIPTION                             |
|-----------|-------|--------|---------|-----------------------------------------|
| mysql     | (any) |        | host, username, password, name, port       |
This provisioner dynamically provisions a dedicated MySQL database on a shared instance, exposing standard outputs such as host, port, and authentication credentials. These outputs can then be referenced in the Score spec using the ${resources.db.*} syntax — without knowing how the database is deployed under the hood.
Want to understand how these provisioners work, what they output, and how to author your own? Explore our deep-dive article on Score Provisioners →
This architectural separation ensures that developers only declare their intent, while platform engineers control how that intent is fulfilled — whether locally via Docker, or inside Kubernetes via CRDs, templates, or operator logic.
3. Generate Kubernetes Manifests from Score.
Once initialized, Score can translate the spec into Kubernetes-native manifests.
This step resolves abstract resource types (such as mysql) into concrete Kubernetes objects including Deployments, Services, and Secrets.
The following command triggers manifest generation:
$ score-k8s generate score.yamlThis command creates a file named manifests.yaml containing the following:
- A Deployment and Service for WordPress.
- A Deployment and Service for MySQL.
- A Secret resource for injected credentials.
To view the generated file:
$ cat manifests.yamlThis output is fully self-contained and ready for application with kubectl.
4. Apply the Manifests and Deploy to Kubernetes.
After manifest generation, the workloads can be deployed to the active Kubernetes cluster (If you dont have one, you can use our provided kind cluster script to spin one up quickly).
The following command provisions a local Kind cluster and prepares it for use:
$ ./scripts/setup-kind-cluster.shThis script outputs progress logs and indicates when the cluster is ready.
After that, the following command applies the contents of manifests.yaml to the cluster:
$ kubectl apply -f manifests.yamlTo verify that the workloads are running correctly:
$ kubectl get podsA healthy deployment will show both WordPress and MySQL pods in Running status:
NAME                         READY   STATUS    RESTARTS   AGE
wordpress-6b7ddf9c8d-mxj24   1/1     Running   0          40s
mysql-8479d7dcd8-cptwv       1/1     Running   0          40s
To confirm that services have been provisioned:
$ kubectl get svcExample output:
NAME        TYPE        CLUSTER-IP      PORT(S)        AGE
wordpress   ClusterIP   10.96.232.117   80/TCP          1m
mysql       ClusterIP   10.96.118.54    3306/TCP        1m
5. Port Forward and Access WordPress.
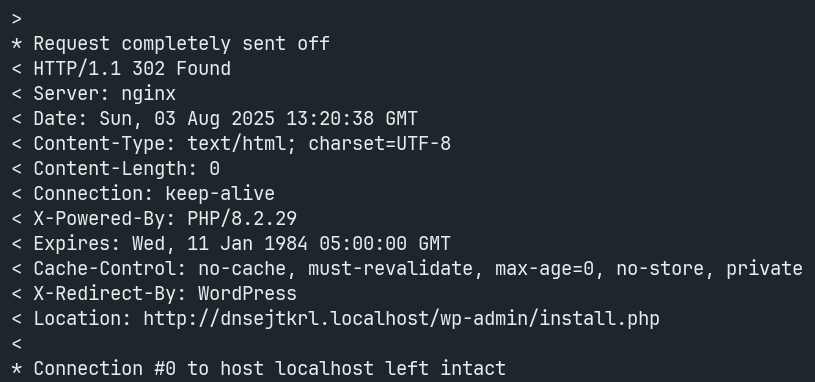
Since ingress routing is not used in this setup, access to the WordPress service is achieved via port forwarding.
The following command maps local port 8080 to port 80 of the wordpress service:
$ kubectl port-forward service/wordpress 8080:80With port-forwarding active, the application becomes available at:
http://localhost:8080Upon loading the page, the WordPress installation interface confirms that the container is running and connected to the MySQL backend.
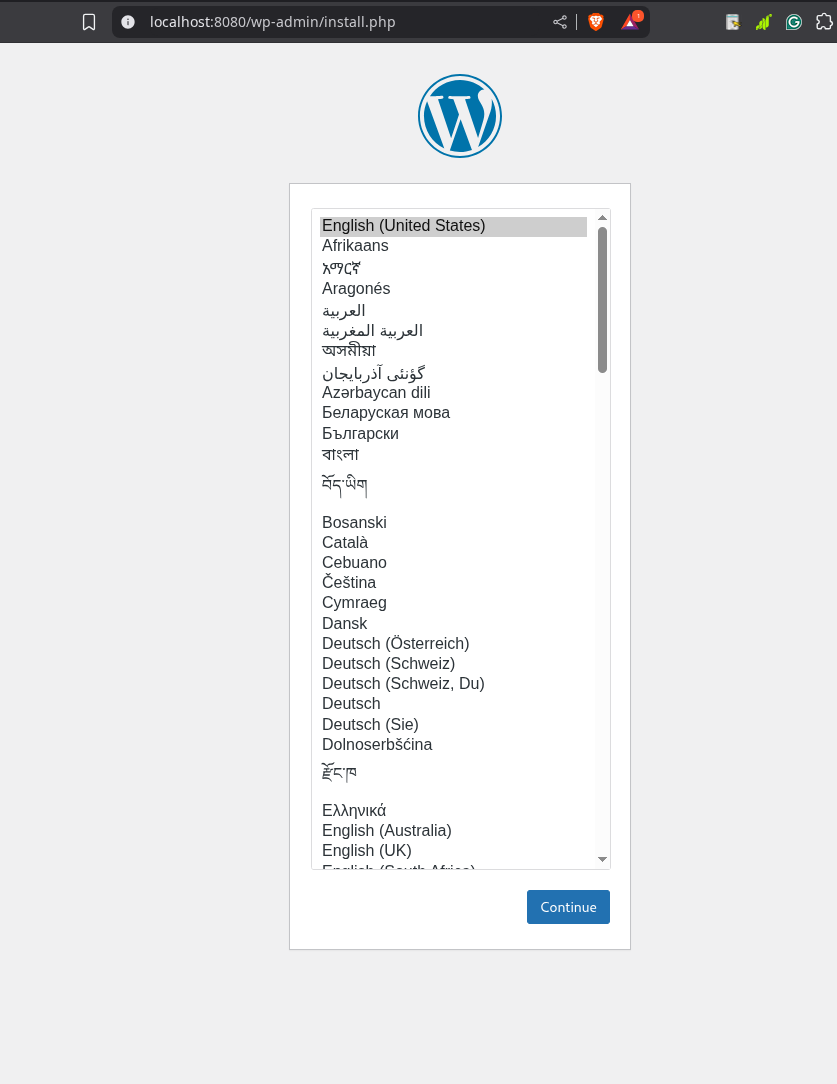
No ingress controller or DNS configuration was required. The deployment remains simple and portable.
Summary
This article demonstrated how to deploy WordPress and MySQL to Kubernetes using a single score.yaml file and the score-k8s CLI.
Key outcomes:
- The same Score spec from Docker Compose was reused on Kubernetes.
- A local Kind cluster was created using a provided setup script.
- MySQL provisioning was handled by Score’s default provisioners.
- Manifests were generated without editing YAML manually.
- Access was provided using
kubectl port-forward.
By decoupling application intent from infrastructure details, Score enables consistent, repeatable workloads across environments — from local dev to production clusters.
In Part 3 we will explore how to deploy the same Score specs using GitOps pipelines and cloud-based platforms such as Humanitec-powered IDPs.
Contribute to the Awesome Score Spec
This example is part of the Awesome Score Spec Examples repository.
⭐️ Star the repo to follow new use cases, contribute additional workload specs, and help grow the Score ecosystem.